Aggiornamento da Lips:
I've seen the handle but not the extension tubes. I believe it is an 8 battery and a 12 battery screw on extension tube to give more run-time for the lights. I don't believe the handles or extension tubes are ready at this moment.
Extra battery carriers to me are $25 (plus shipping if they can't be grouped in existing package) so same price to you...
I'll likely get 10 1st batch lights and some extra battery carriers headed this way in the next few days along with repair station parts for those that want to try the first batch and don't want to wait. I still feel it is best to proceed slowly as some will be landing lights shortly for a hands on. Clarification on how the functions work and if there are any standout problems... I will then ramp up on the 2nd batch to be made (not second batch to ship out)
I asked for clarification on how lights worked and was sent the manual... Didn't really help much on that front.
The manual Sent to me leaves out the dimming, memory, level to get to 60w, how many times can you go to 60w (1 in the beginning) without requiring a on-off cycle are not in there... Looks like a partial manual...
MANUAL
II. HID flashlight features
1. HID light is generated by electric arc breaking through the inert gas, no filament is applied there.
2. The HID startup is a process of tube warmingup. It takes about 15 seconds to gain a constant power and 40 seconds (or longer) to reach a full brightness. There might be flash during the whole process.
3. HID color temperature adjustment relies on the metal halide. It is usually yellow in cool state and attaching on the inner wall of the tube.
4. With HID flashlight, a pink or yellow brink around the beam spot is visible. This is caused by the effect of gravity to gaseous metal halide. The color may gradually fade away while the light goes on.
5. The HID flashlight uses high-temperature lamp and steam may occur on the center of lens after long lighting. It will disappear after a few hours.
III. Safety notices
1. Don't irradiate the eyes within 50 meters to avoid a short-term visual impairment.
2. Use it with good morality. Don't disturb people nor interfere the traffic. Irradiating the crowd, residential buildings, running cars or low-flying aircraft at night are also prohibited.
3. Don’t touch the lens while the light is on to avoid skin scald.
4. After flashlight is turned off, do take some time to cool it down before restoring it into a bag.
5. Continue usage with proper interruptions is recommended in a windless environment.
6. During transportation or long idle state, it is recommended to remove batteries to avoid inadvertently turned on.
IV. Battery rack and battery
Battery rack
1. The battery rack with indicators shows the status of the over current, short circuit, over discharging, reverse polarity protection.
2. Over-discharging protection is for the total voltage detection, a good conformity of batteries is required.
3. When the battery level is less than 10%, system will cut off the power and get into protection mode.
4. When electric current is large or frequent switching on/off in a short period, system will cut off the power and get into protection mode.
5. When flashlight is in protection mode, just turn it off to relief the mode.
6. While in cryogenic environment, switching on flashlight may trigger the protection mode. Just restart it to relief the mode.
7. If the rack is loaded with batteries, do switch it off while sliding it into the flashlight.
(There might be variation between different types of batteries, articles 2,3are for reference only)
Battery
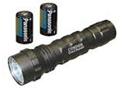
1. The battery rack consists of four nonprotected 18650 lithium batteries.
2. Please use good quality battery with capacity more than 2,400 mAh, and internal resistance less than 100 mΩ. Even better they are of the same type and of the same batch lot. Sanyo 2600 mAh or the Panasonic 2900 mAh are recommended. Please avoid the usage of dismantled batteries.
3. Use good quality charger to ensure battery’s balance and lengthen its life span.
4. When fitting batteries into the rack, connect the negative pole (flat surface with no hole) to the spring.
5. Make sure the capacity of each battery is of the same level because over-discharging damage is easily occurred on batteries. Avoid situations like: a certain battery is consumed alone or some batteries are forgotten to recharge.
6. Four Sanyo 2600mAh batteries will normally last 45 - 75 minutes(Overheating auto reduce power, depending on the use).
V. Safety lock and dimming
1. Safety lock is located in the tail, open the safety lock then press the side switch to turn on the light, turn off the safety lock can turn off the light;
....alla prossima.